Step-by-Step Process of Turning Photos into Custom Paintings
Author:
GeorgeUpdated:
04.08.2025


- Key Takeaways
- Step 1. Choosing the Right Photo
- Step 2. Choosing the Art Style
- 1.Realistic
- 2.Cartoon or Illustrative
- 3.Impressionist or Abstract
- 4.Pop Art & Minimalist
- 1.
- Step 3. Choosing the Right Medium
- 5.Digital Paintings
- 6.Traditional Mediums
- 7.Side-by-Side Comparison
- 5.
- Step 4. Finding the Right Artist
- 8.Etsy
- 9.Instagram
- 10.Fiverr and Upwork
- 11.Photo2Painting
- 8.
- Step 5. Placing the Order
- Step 6. Sketches or Previews (If Available)
- Step 7. The Painting Process Begins
- 12.What affects the timeline?
- 12.
- Step 8. Approval & Final Touches
- 13.When Does This Happen?
- 14.What Can Be Changed?
- 15.What to Ask Before You Approve
- 16.Why This Step Matters
- 13.
- Step 9. Framing and Displaying Your Painting
- 17.Choosing the Right Frame
- 18.Matting or No Matting?
- 19.Framing Digital Art
- 20.Hanging It Up
- 17.
Ever taken a photo you really loved—of your pet, your family, or a special place—but then it just stayed on your phone, forgotten?
That’s the problem with most pictures today. We take so many, but rarely do anything meaningful with them. They get lost in our camera rolls, buried under selfies and screenshots.
Now imagine turning that one special photo into a real painting—something you can hang on your wall, gift to someone, or keep forever. A custom painting brings your memory to life in a way a photo never could.
“A painting requires a little mystery, some vagueness, and some fantasy.” — Edgar Degas
Let’s walk through step by step on how you can turn a simple photo into a one-of-a-kind piece of art.
Key Takeaways
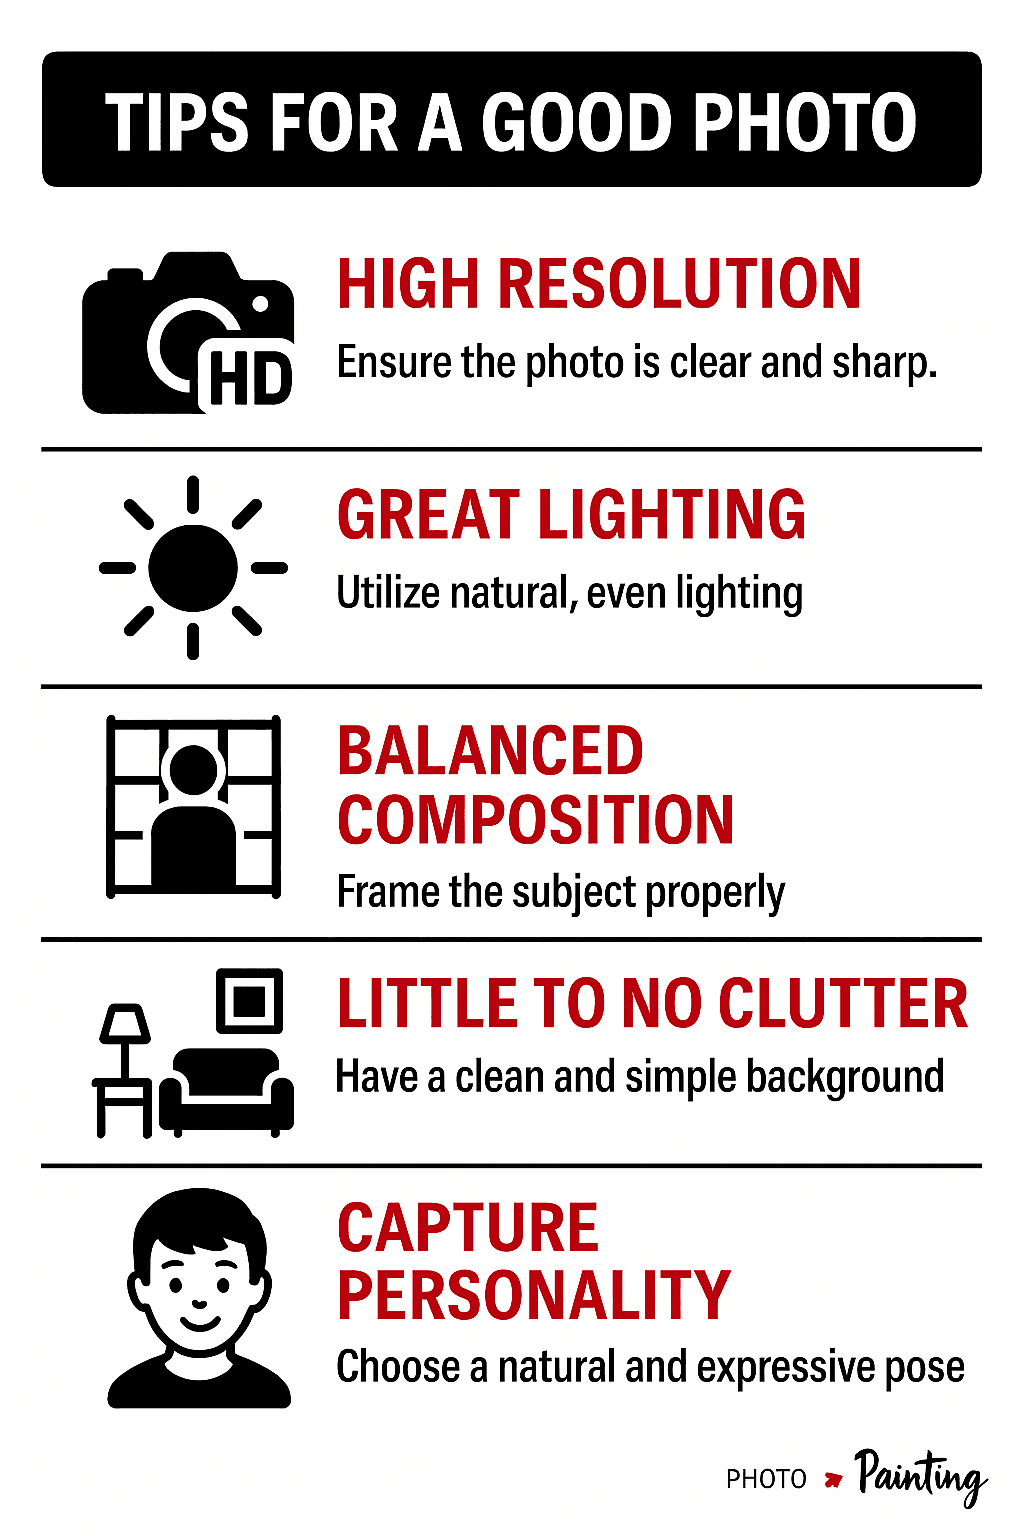
Start with a great photo. Clear, well-lit, and meaningful images make the best paintings.
Choose a style that fits your vision. Whether it’s realistic, cartoon, or abstract, match the art to the emotion you want to express.
Pick the right artist: Always check their past work, reviews, and whether they offer revisions or previews.
Communication is key. Share your ideas clearly—like background changes, combined photos, or clothing edits.
Digital vs. traditional matters. Decide if you want a physical painting (oil, watercolor) or a digital file/print.
Plan for timing. Custom art can take days or weeks—order early, especially if it’s a gift.
Paintings make memories last. A custom piece isn’t just art—it’s a personal story you can see and share.
Step 1. Choosing the Right Photo
Picking the right reference photo is one of the most important steps in getting a beautiful custom painting. Here’s what to consider.
- Use natural lighting when possible
Photos taken in soft daylight (like near a window or during golden hour) show true colors and smooth shadows. Harsh midday sun can cause squinting and sharp contrasts, while flash often creates shiny spots and red eyes.
- Avoid dark, blurry, or grainy images
Low-resolution photos may look okay on your phone, but when an artist zooms in to paint, key details can be lost. The better the photo quality, the more lifelike and detailed your painting will be.
- Emotional value matters just as much as quality
A technically perfect photo isn’t always the most meaningful. Choose an image that makes you feel something—a moment you want to remember forever. A genuine laugh, a quiet glance, or a cozy pet nap can be more powerful than a posed portrait.
- Capture personality and story
Whether it’s a dog sitting proudly in its favorite spot, a child mid-giggle, or your favorite view from vacation, the best photos show personality. Think about what you want the painting to say.
- Mind the background (but it’s okay to change it)
A cluttered background can distract from the subject, but many artists can simplify or replace it. Still, the cleaner the original photo, the easier it is to work from.
- Ask the artist if you’re unsure
When in doubt, send a few photo options. Most artists are happy to help you choose the best one based on lighting, detail, and composition.
“The best thing about a picture is that it never changes, even when the people in it do.” — Andy Warhol
Step 2. Choosing the Art Style
Once you've chosen your favorite photo, the next step is deciding how you want it to look. The art style you pick will shape the entire mood of your custom painting—whether it feels classic, playful, emotional, or modern.
Realistic
Realism is perfect for portraits, pet memorials, or meaningful places. This style captures fine details, natural colors, and accurate proportions. It’s timeless and ideal if you want something that closely resembles the photo.
Cartoon or Illustrative
Fun, vibrant, and full of personality. These styles are great for kids, pets, or couple gifts—adding a charming twist to the subject with bold lines or exaggerated features.
Impressionist or Abstract
Impressionism and Abstract art style focus more on emotion and atmosphere. With visible brushstrokes, soft colors, and a looser feel, they’re ideal for dreamy landscapes, romantic scenes, or nostalgic moments.
Pop Art & Minimalist
Bold and modern. Pop art is bright, playful, and inspired by artists like Warhol, while minimalist pieces use clean lines and simple colors to create an elegant, contemporary look.
Occasion or Purpose | Recommended Style |
Weddings or Anniversaries | Watercolor or Impressionist |
Fun Birthdays | Cartoon or Pop Art |
Memorial Pieces | Pencil or Soft Realism |
Modern Home Décor | Minimalist or Digital Pop Art |
Kids’ Rooms | Bright, Cartoon-Inspired Illustrations |
Step 3. Choosing the Right Medium
Just like art style, the medium you choose plays a big role in how your painting looks, feels, and even how it's displayed. Some mediums are soft and romantic, while others are bold and textured. Some are made by hand with brushes and paint, while others are created digitally—but no less meaningful.
Digital Paintings
Digital paintings are created using a stylus and tablet instead of traditional brushes. Artists use software to paint, layer, blend, and add details—just like they would with real paint.
Why people love digital art:
- No drying time, which means quicker delivery.
- Usually more affordable than hand-painted work.
- You can print the final image on canvas, paper, mugs, phone cases—you name it.
- Works especially well for cartoon portraits, pop art, or minimalist designs.
You won’t get natural brushstrokes or paint texture unless it’s printed on textured canvas or paper. But for many, the clarity and ease of digital art make it a top pick.
Traditional Mediums
Traditional paintings are made by hand using physical materials like paint, pencil, or charcoal. They offer texture, richness, and a truly one-of-a-kind feel. Popular traditional mediums are,
Oil Painting
Deep, rich colors with a classic feel. It takes longer to dry but lasts for decades. Great for elegant, heirloom-quality pieces.
Acrylic
Bright and bold. Dries fast and works well for colorful scenes or pet portraits. Less textured than oil but more durable than watercolor.
Watercolor
Soft, transparent, and flowing. Perfect for romantic or emotional moments—like weddings, babies, or nature scenes.
Pencil or Charcoal
Elegant and timeless in black and white. Ideal for detailed portraits or subtle memorial artwork. No color, but a lot of mood and depth.
Traditional paintings may take longer to complete, cost more, and require careful packaging for shipping. But they’re physical, textured, and full of presence.
Side-by-Side Comparison
Feature | Digital Painting | Traditional Painting |
Creation Process | On tablet with stylus | By hand with paint, pencil, or charcoal |
Turnaround Time | Fast | Slower (especially oil) |
Price Range | Generally more affordable | Often higher, depending on size & medium |
Texture | Smooth (unless printed on textured material) | Natural brush/pencil texture |
Printing Options | Easily printed on canvas, paper, products | Already physical—no printing needed |
Best For | Pop art, cartoon, minimalist | Realism, emotional portraits, classic styles |
Uniqueness | Can be duplicated | One-of-a-kind original |
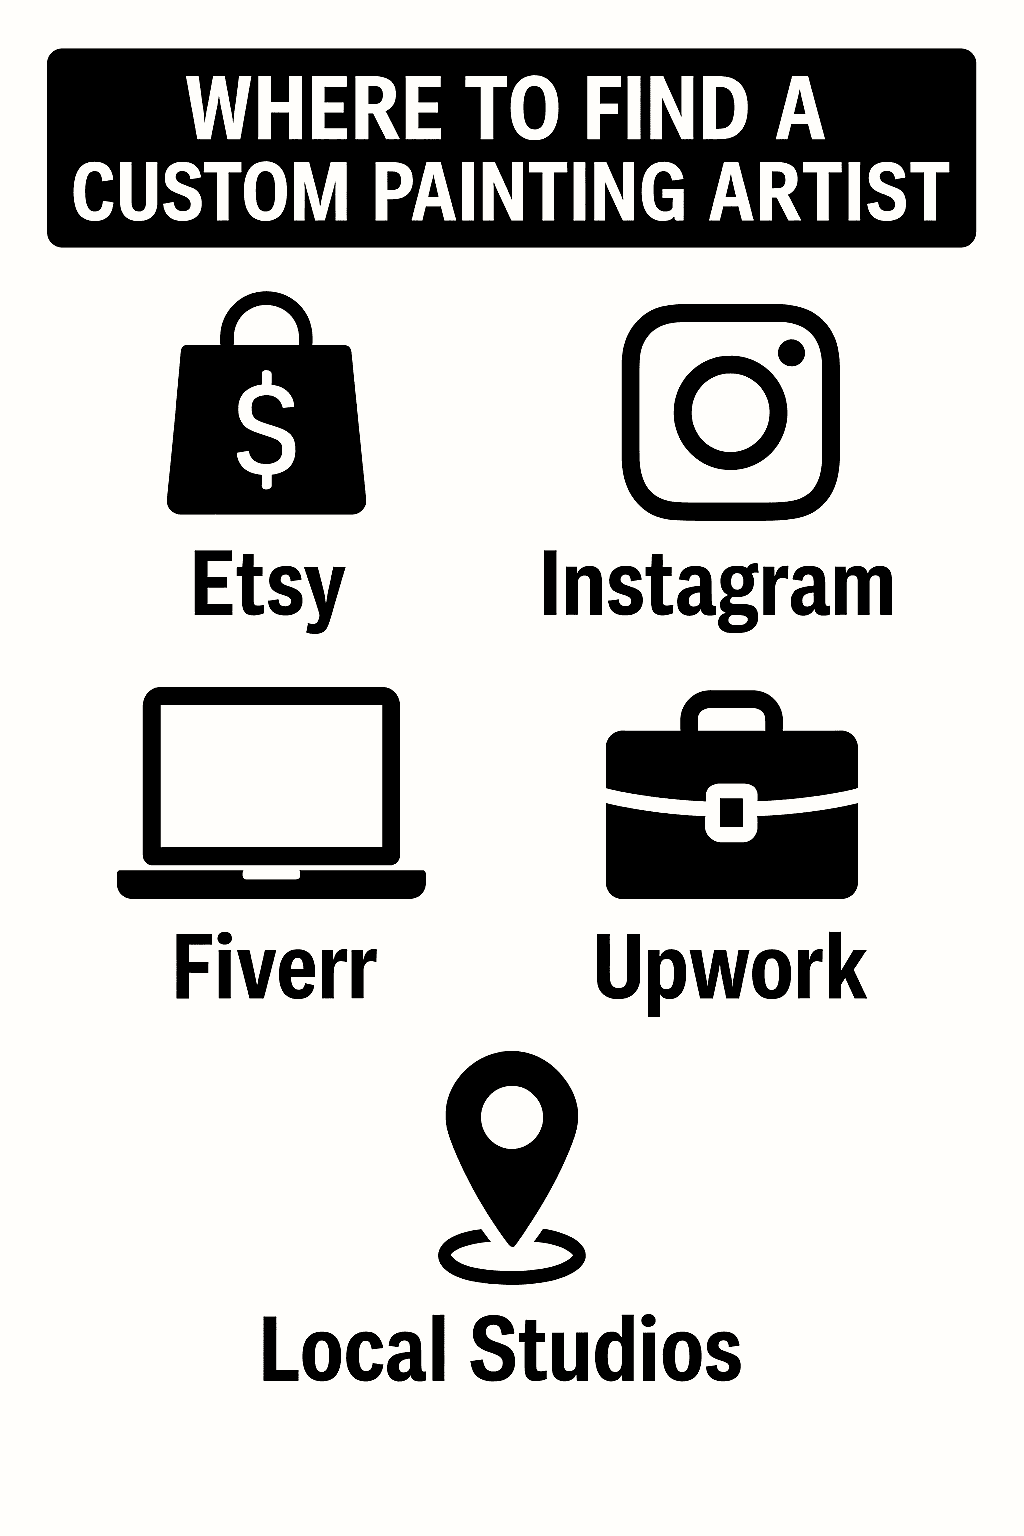
Step 4. Finding the Right Artist
Finding the right artist is just as important as choosing the perfect photo or style. You're trusting someone to turn a personal memory into a piece of art, so it’s worth taking time to make sure they’re a good fit. That means looking beyond just talent—you want someone whose style matches your vision, who communicates clearly, and who delivers on time.
Etsy
If you're looking to explore more styles or want a completely unique touch, Etsy is another excellent option. You can browse thousands of art shops, each with its own style, price point, and customer reviews. Many artists offer both digital and traditional paintings, and you’ll find clear examples of their past work. Just be sure to check what’s included—some shops only send digital files, while others offer framed, ready-to-hang art.
Instagram is a more casual but creative way to find artists. Many post work-in-progress clips, full galleries, and even highlight real customer stories. You’ll get a good sense of their personality and workflow, but keep in mind that most orders are managed through direct messaging or email. Always ask about turnaround time, payment terms, and whether they offer previews or edits.
Fiverr and Upwork
For faster or budget-friendly digital work, Fiverr and Upwork let you filter artists by price, style, and delivery speed. These platforms are convenient and often inexpensive, but be cautious—some profiles use AI art or stolen work as samples. Make sure the artist has verified reviews and original examples of their process.
Photo2Painting
One of the most reliable options is Photo2Painting, which simplifies the entire process. You upload your photo, pick an art style—like realism, cartoon, or watercolor—and choose your preferred size and medium. From there, the platform matches you with an experienced artist and handles the details. It's fast, secure, and especially useful if you're ordering as a gift or don't have time to manage the back-and-forth with a freelancer. You also get revision options, customer support, and a satisfaction guarantee—something many individual artists don’t offer. You can check the custom paintings here.
You can also check with local studios or art schools if you prefer to work in person. Art students often take on commissions to build their portfolios and may offer lower rates for high-quality work. Local galleries and community events can also connect you with painters who do custom work.
When reviewing an artist, keep an eye out for these key things,
- A strong portfolio that shows consistency and matches the style you want
- Clear communication about timelines, revisions, and what’s included
- Reviews or testimonials that mention quality, professionalism, and delivery
- Transparency about pricing and whether physical delivery or digital files are included
Ultimately, you want someone who doesn't just paint well—but who listens to what you’re looking for, respects the subject of the painting, and treats your order with care.
Step 5. Placing the Order
Once you’ve found the right artist or platform, it’s time to place your order and set the project in motion. This step is more than just clicking “buy”—it’s your chance to share your vision and make sure everything is clearly understood before the painting begins.
The first thing you’ll typically do is upload your photo. Make sure it’s high quality—clear, well-lit, and emotionally meaningful. Most platforms, including Photo2Painting, will allow you to attach notes or describe what you want the final piece to look like. Take advantage of this. It’s your chance to communicate the mood, emotion, or little details that matter to you.
Many artists and services also allow optional customizations to make your piece even more personal, such as changing the background (like replacing a cluttered room with a scenic view), adjusting facial expressions or outfits (for example, adding a smile or changing clothing), combining subjects from multiple photos (which is perfect if you don’t have one ideal shot), or adding text, names, dates, or meaningful quotes.
Don’t be afraid to explain your ideas, even if you’re unsure what’s possible—many artists are happy to offer suggestions or alternatives.
It’s also important to be clear about the technical details. Always confirm,
- The size of the painting or print (in inches or cm)
- The medium (digital file, canvas, watercolor, etc.)
- The delivery format (shipped artwork, digital download, or both)
- Your timeline or deadline, especially if it’s for a gift
If you’re using Photo2Painting, most of these options are built into the ordering process and clearly laid out. But if you’re working with an independent artist, make sure you get all expectations in writing—especially for pricing, revisions, and delivery time.
Placing the order is your opportunity to set the tone for the project. The clearer your communication, the smoother the process—and the more likely you are to receive a painting that captures exactly what you imagined.
Step 6. Sketches or Previews (If Available)
Not all artists offer previews—but when they do, it's one of the most valuable steps in the process. A rough sketch or digital draft gives you a glimpse of what the final painting will look like before the real work begins.
This stage is especially helpful if you're requesting changes to the original photo, such as adding or removing elements, changing the background, or combining multiple people or pets. Seeing a mock-up lets you confirm that the pose, layout, or overall feel is right.
It’s also your opportunity to give feedback. If something feels off—like the expression, proportions, or colors—you can request small adjustments before the artist moves forward. Most artists are happy to make tweaks at this stage, but once painting begins, changes are much harder (or impossible) to make.
Some services, like Photo2Painting, offer preview options depending on the product you choose. If you’re working with a freelancer or independent artist, it’s important to ask upfront whether you’ll see a sketch or layout before the final piece, if revisions are included (and how many), and what types of changes you’re allowed to request.
If previews aren’t part of the process, it’s even more important to choose a photo and style that you're fully confident in from the start.
In short, if a sketch is available—use it wisely. It’s your chance to collaborate and make sure your painting reflects exactly what you envisioned.
Step 7. The Painting Process Begins
Once you've approved the photo and shared your vision, the artist gets to work—and this is where the magic happens behind the scenes. While you might not see every brushstroke or digital layer, knowing what’s happening during this phase can help you appreciate the time, care, and skill that goes into your custom piece.
If you're working with a traditional artist, the process typically starts with a light pencil sketch on canvas or paper. From there, the artist builds the painting in layers—adding color, texture, and detail gradually. Some mediums, like oil paint, require drying time between layers, which can stretch the timeline. Watercolor and acrylic dry faster, but they still involve multiple steps to get the depth and balance just right.
For digital art, the process is faster but just as involved. The artist begins by mapping out the composition, then moves into rendering shapes, applying color, and refining every detail. Digital tools allow for easy adjustments, so the artist may zoom in to perfect facial expressions, lighting, and textures that bring the image to life. Even though there’s no physical drying time, digital painting still takes hours of focused work—especially for complex or highly realistic pieces.
What affects the timeline?
- Medium
Oil can take 2–4 weeks due to drying time, while digital pieces may take 3–7 days.
- Size
Larger paintings naturally take longer to complete.
- Detail level
A full family portrait with a detailed background takes more time than a minimalist pet portrait.
- Revisions
If you’ve requested edits during the preview stage, the process may take a bit longer.
Most services and artists will give you an estimated delivery window before they begin, but it’s always a good idea to ask for updates if you have a specific deadline.
While you’re waiting, know that your artist is carefully bringing your vision to life—layer by layer, detail by detail. This is the part of the journey where patience pays off.
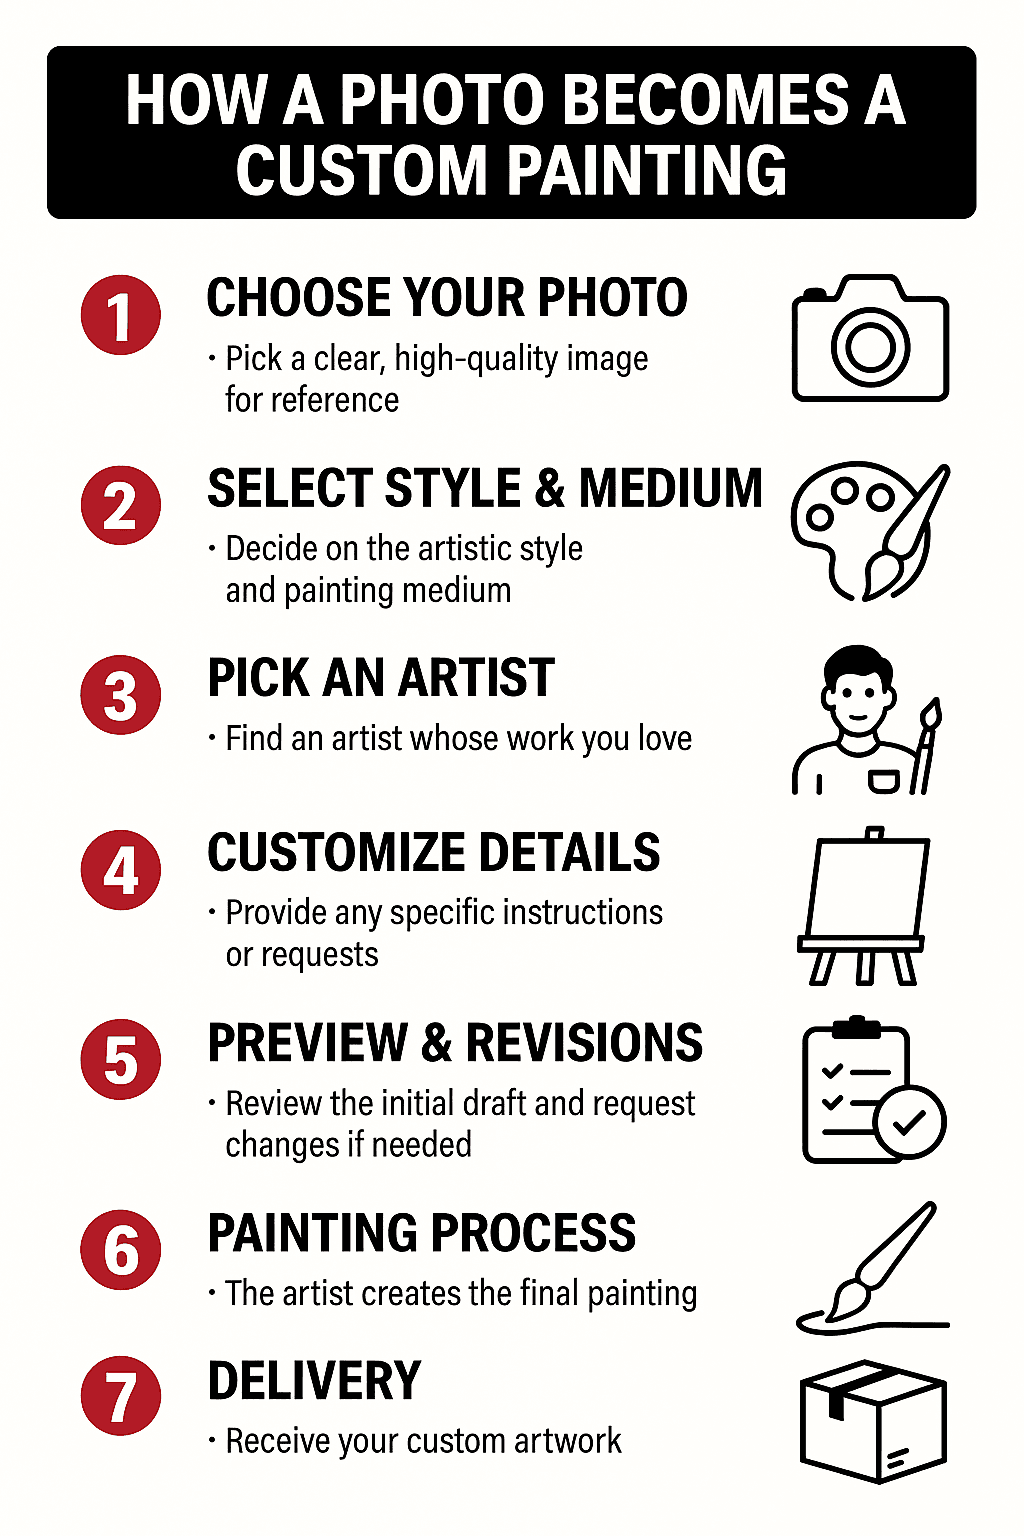
Step 8. Approval & Final Touches
As the painting nears completion, most artists or platforms will give you one last chance to review the final version before it's officially finished. This is where you check for any last details and confirm that the artwork is exactly what you hoped for.
When Does This Happen?
- With traditional paintings you'll typically see a photo of the finished piece before the artist applies a protective varnish or prepares it for shipping. Once it’s sealed, changes can’t be made without damaging the work.
- With digital paintings you’ll receive a final draft image—usually a high-resolution preview. After you approve it, the artist will send the final file or have it printed and shipped.
Not all artists offer this step automatically, so it’s always smart to ask ahead of time if a final preview will be provided.
What Can Be Changed?
This stage is meant for small final touches—not major revisions. Most artists are open to slight color corrections if something appears too bright or dull, minor facial tweaks like adjusting a smile or eye shape, softening or blending parts of the background, fixing tiny details such as a wrinkle, shadow, or strand of hair, and adjusting any added text like a name, quote, or date.
Anything larger—like redoing the pose or changing the composition—usually isn’t possible at this point, especially with physical paintings.
What to Ask Before You Approve
To avoid surprises, ask these questions when you get the final preview.
- Is this the exact version that will be shipped or printed?
- Can I still request minor changes at this point?
- Will edits delay the final delivery?
- Can I see how it will look framed or printed, if applicable?
If you’re on a deadline (like a birthday or anniversary), it’s worth confirming that edits won’t push back the timeline too much.
Why This Step Matters
The approval stage is your last opportunity to make sure everything feels right—from color and composition to small emotional touches. Once you approve the final version,
- Traditional art is sealed, packaged, and shipped.
- Digital art is finalized and emailed or sent to print.
- Printed pieces are sent to production and framing (if applicable).
After this point, changes can’t be made—so don’t feel rushed. Take your time, look at the image in good lighting (on a proper screen if digital), and speak up if something feels off.
Step 9. Framing and Displaying Your Painting
Once your custom painting is finished, framing it the right way makes a huge difference. A good frame doesn’t just protect your artwork—it enhances it, helping it feel like a finished piece ready to be admired.
Whether you’ve ordered a physical painting or plan to print a digital file, the way you present it matters just as much as the art itself.
Choosing the Right Frame
The right frame depends on your painting’s style, medium, and the vibe of the space where it’ll hang.
Frame Type | Best For | Why It Works |
Classic Wood Frame | Oil paintings, traditional portraits | Adds warmth and elegance; timeless and sturdy |
Ornate/Decorative | Formal portraits, heirloom pieces | Makes the artwork feel luxurious and grand |
Minimalist Black/White | Watercolors, pencil drawings, modern spaces | Clean, simple, and lets the artwork stand out |
Floating Frame | Canvas prints, digital paintings | Creates a gallery-style look with depth |
Metal Frame | Pop art, minimalist or digital art | Sleek and modern; works well in contemporary spaces |
Matting or No Matting?
A mat is a border that sits between your artwork and the frame’s glass. It’s optional but often recommended for watercolor and pencil pieces as mats help prevent the paper from touching the glass, which protects it over time. Also it helps with Smaller pieces. A mat can make a small painting feel more substantial and gallery-ready.
Just make sure the mat is acid-free, especially for original artworks. Cheaper mats can cause yellowing over time.
Framing Digital Art
If you received a digital file, you have a few great options: you can print it on high-quality matte or textured paper and frame it under glass, print it on canvas for a gallery-style look that doesn’t require a frame, or use a local print shop or online service that offers framing and mounting for a clean, professional finish.
Make sure to print in the original resolution the artist provided for the best quality.
Hanging It Up
Where you display your painting affects how it ages and how it’s appreciated.
- Avoid direct sunlight, especially for watercolors or prints—they can fade over time.
- Don’t hang artwork above heat sources like radiators or fireplaces.
- For heavier paintings, use wall anchors or picture-hanging systems to keep them secure.
Framing brings the painting to life—it makes it feel intentional, permanent, and ready to be admired. Whether you keep it simple or go all-out with a statement frame, make sure it complements the artwork, not competes with it.
Conclusion
A custom painting is more than a decoration—it’s a story, a memory, a moment you chose to honor in a lasting way. Whether it’s your pet, your family, a favorite place, or a special occasion, the journey from photo to painting is full of personal choices. From selecting the perfect image to choosing the right artist, style, medium, and frame, each step shapes the final result.
The good news? You don’t have to be an art expert to get it right. As long as you know what matters to you—and communicate that clearly—you’re already halfway there. Platforms like Photo2Painting make the process easy, but even if you go the freelance route, knowing what to expect helps you avoid mistakes and get a painting that truly means something.
“Art is the only way to run away without leaving home.” — Twyla Tharp
So whether you’re gifting it or hanging it in your own space, your custom painting isn’t just art—it’s personal. And that’s what makes it powerful.
Frequently Asked Questions
Can you combine multiple photos into a single painting?
Yes, of course! We can combine any number of photos and turn them into a single artwork! And the process is quite easy – all you need to do is upload (or e-mail) us the photographs and provide detailed instructions in the comment box when placing an order.
Can I request changes to my family pencil drawing order?
Yes, you will have the opportunity to review your family pencil drawing during the creation process. If any adjustments are needed, you can provide feedback to ensure the final artwork meets your expectations.
What types of photos work best for custom paintings?
High-resolution, well-lit images with a clear subject work best for custom paintings. Sharp and detailed photos allow artists to capture fine details, such as facial expressions or textures. It’s also important that the subject is well-framed and not covered by shadows or blurriness. The better the quality of the photo, the more accurate and vibrant your custom painting will be! Our team is happy to help you choose the perfect image if you're unsure.
Can I request changes to the painting after seeing the preview?
Yes, you can request changes after seeing the preview. Before we begin the final painting, we send you a digital mock-up for your approval. If there’s anything you'd like adjusted, like the colors, details, or overall look, just let us know! We’ll work with you to ensure the painting meets your expectations before moving forward. Your satisfaction is our top priority, so feel free to suggest any tweaks so the artwork is exactly what you pictured in your mind.
How do I choose the right artist?
Check their portfolio to see if their style matches your vision. Read reviews, ask about their process, and make sure they communicate clearly. A good artist will be upfront about price, timeline, and what’s included.
George, CEO of Photo2painting, is a passionate art lover and entrepreneur. He founded Photo2painting.com from scratch, inspired by his artist friends. As the company's CMO, he manages content and marketing.
Excellent Customer Reviews