Learn Drawing Basics From Scratch - Beginners Guide
Author:
GeorgeUpdated:
02.02.2025


- What is the Art of Drawing?
- 1.The Importance of Drawing
- 1.
- Start with Beginner Drawing Exercises
- 2.Free Your Hand
- 3.Line Drawing
- 4.Grab A Piece Of Paper
- 5.The Technique Of Shade
- 2.
- How to Draw a Flower in 5 Steps
- 6.Identify the Parts of a Flower
- 7.Steps to Draw a Flower
- 6.
- Learn to Draw Hands in 4 Steps
- 8.Understand the Structure of Hand
- 9.Steps to Draw Hands
- 8.
- How to Craft Lifelike Faces in Your Drawings
- 10.Step-by-Step Guide to Drawing a Realistic Face
- 11.To Create a Face in Profile
- 10.
- How to Craft Cartoon Faces with Ease
- 12.Start Your Cartoon Journey
- 13.Build Your Cartoon Character
- 14.Drawing Cartoon Eyes
- 15.The Nose and Mouth – Expressing Character
- 16.Ears and Hair – Adds Personality
- 17.Bring It All Together
- 12.
- To Master Proportions in Drawing
- 18.Proportions in Natural Objects
- 19.Proportions in Man-made Objects
- 18.
- The Concept of Light and Shadow
- 20.What is Light and Shadow in Drawing
- 21.Apply Light and Shadow in Practice
- 20.
At its core, drawing requires nothing more than a pencil and paper, allowing virtually anyone to start their artistic journey without the need for expensive or sophisticated tools.
Despite this, beginners often find it difficult to resist collecting a large amount of art supplies. The misconception that artistic progress is tightly related to the quality of one's tools can lead to unnecessary expenses and distractions.
There are a variety of materials available on the art market, ranging from specialized pencils to specialized types of paper, all promising to enhance one's artistic abilities. There are so many options that beginners often wonder if their lack of progress is because they don't have the right tools, or if more practice would help. Your experiences, vision, and technique will shape your artistic identity.
In summary, while it may be tempting to believe that acquiring better tools will automatically make you a better artist, practice and dedication truly drive improvement. By embracing the limitations of simple tools, you can develop creativity and a deeper understanding of the medium by embracing their limitations.
You should spend some time practicing and understanding drawing principles, and most importantly, enjoy the process of creating. Some of the greatest artworks were created with the simplest tools.
What is the Art of Drawing?
The art of drawing is a fundamental and versatile form of visual expression and communication, encompassing a wide range of techniques and media. At its core, drawing involves creating images on a surface, typically paper, using tools like ink, graphite, chalk, charcoal, or crayon. It's a direct and intimate process that captures the artist's hand directly on the medium.
Drawing is often considered the foundation of all visual arts. It serves as a crucial step in the creation of various art forms, from painting to sculpture. In many cases, a drawing acts as a preliminary sketch, outlining the basic contours and ideas that are later developed into more complex works.
This process is evident in everything from the ground plans of buildings to the initial markings on a stone block intended for sculpting. Essentially, even the most elaborate paintings and sculptures often begin with the simple act of drawing.
The Importance of Drawing
Historically, drawing gained significant recognition as an independent art form in the late 14th century. This shift marked the transition from drawing being seen primarily as a preparatory or functional activity to being valued as a complete and autonomous artistic activity. Drawings began to be appreciated not just for their role in the creative process but as unique and complete works of art in their own right.
What makes drawing particularly compelling is its ability to convey a wide range of artistic intentions and expressions. Through drawing, artists can depict bodies, space, depth, and even motion.
The immediacy and directness of drawing often allow the artist's personality to be vividly expressed through the line quality and style. This personal aspect of drawing makes it a unique and powerful tool for artistic expression.
Start with Beginner Drawing Exercises
Here are some techniques to consider:
Free Your Hand
When you're just beginning your journey into drawing, it might seem like a challenge to translate what you see or imagine onto paper. The key lies in developing two fundamental skills: line drawing and shading. Let's break these down into simple exercises that you can practice to improve your technique.
Line Drawing
Lines are the backbone of your drawing, defining shapes and outlines. As a beginner, it's common to struggle with making smooth, confident lines. But don't worry, there's a fun and easy exercise to help you out.
Grab A Piece Of Paper
Draw two small dots at random places. Now, try to connect these dots with a single, fluid stroke. It sounds simple, but it's incredibly effective in improving your line work. Practice this with different types of lines – straight, curved, or even zigzag. The goal is to train your hand to move freely and confidently.
The Technique Of Shade

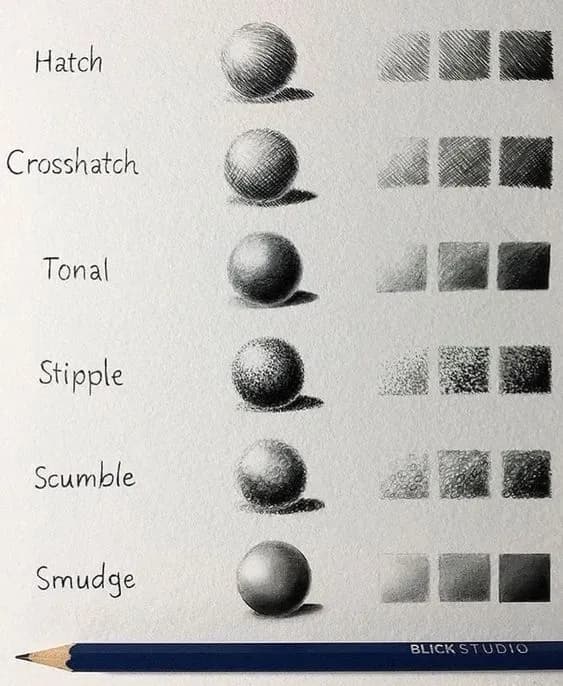
Shading adds depth and dimension to your drawings, giving them a more realistic appearance. A great starting point for beginners is the parallel hatching technique.
It's quite straightforward – you draw several lines close together in the same direction.
This technique is great for creating uniform areas of shade. Feel free to experiment and find the angle that feels most natural to you.
Remember, the goal at this stage is not to perfect complex shading techniques but to build a solid foundation. Stick with parallel hatching for the first few weeks. It's a simple method, but you'll be amazed at the depth and texture you can achieve with it.
How to Draw a Flower in 5 Steps
Drawing flowers can be a rewarding experience, whether you're an experienced artist or just getting started. With their variety of shapes, textures, and colors, flowers can be explored and explored creatively. Let's break it down into simple, manageable steps, keeping it light and conversational.
Identify the Parts of a Flower
Each element plays a vital role in the flower's anatomy and aesthetic appeal. The petals are the most noticeable part, often vibrant and eye-catching, acting like a splendid outfit that draws attention and admiration. At the flower's core lies the center, often referred to as the heart, where vital reproductive structures such as stamens and pistils exist – this is where the essential processes of pollination and reproduction occur, making it a hub of botanical activity.
Surrounding this central area, we often find additional parts like sepals, which protect the bud before it blooms. Then, supporting the entire structure is the stem, a crucial backbone that not only holds the flower upright but also transports nutrients and water from the roots.
Accompanying the stem are the leaves, the unsung heroes, which work tirelessly through photosynthesis to provide food for the flower and often add to its overall aesthetic with their shapes and textures. Understanding these parts not only enhances our appreciation of a flower's beauty but also deepens our knowledge of its complex and fascinating biology.
Steps to Draw a Flower

1. Start with the Heart
Every great story, or in this case, drawing, starts from the heart. Begin by sketching the center of your flower. This could be a simple circle or a cluster of tiny dots or lines, depending on the flower you're drawing. Think of it as setting the stage for the rest of your creation.
2. Sketch the Outfit (Petals)
Now for the fun part - adding the petals. Start drawing them around the center you just created. Remember, nature isn't about perfection. If your petals are a bit uneven or quirky, that’s great! It adds character to your flower.
You can go for long, elegant shapes, or maybe short and plump ones, depending on the type of flower you're drawing.
3. Bring in the Support Crew (Stem and Leaves)
After your petals are in place, draw the stem. It can be a simple straight line or slightly curved. Then, add some leaves - they can be as simple or detailed as you like. Maybe they’re long and slender or wide and round; it's all up to you.
4. Add Personality with Details
This is where you get to play and have fun! Add details to the petals, like veins or subtle textures. For the center, maybe sprinkle in some more dots or tiny lines to give it depth. With the leaves, a few veins can make a big difference in making them look lifelike.
5. Finish Touches
Step back and take a look. Do the petals need more curves? Does the stem need to be thicker? Add these final tweaks, and voila, you’ve got yourself a beautiful flower drawing!
Learn to Draw Hands in 4 Steps
Hands are one of the most expressive parts of the human body, and mastering their depiction can significantly elevate your art. Learning to draw them is a fantastic journey into understanding one of the most expressive parts of the body. Let's break this down into manageable steps.
Understand the Structure of Hand

Hands are not just complex in form but also highly expressive. Envisioning a hand, one sees a sophisticated blend of shapes: the palm resembles a flattened, flexible box, forming the base from which the fingers extend. Each finger, in turn, is composed of a series of cylinders – the proximal, middle, and distal phalanges – allowing for remarkable flexibility and control.
The thumb, uniquely positioned with just two primary segments, offers a wider range of motion, crucial for grasping and manipulation. Integral to this structure are the joints, acting as hinges at the intersections of the phalanges. These joints are essential in facilitating the bending and movement of the fingers and thumb.
Understanding these elements and how they coexist and work together is crucial for realistically capturing the dynamic nature of hands in art.
Steps to Draw Hands
1. Start with the Palm
Think of the palm as your base camp. It's where you start your journey. Visualize the palm as a slightly bent box. This isn't just any box; it has curves and cushions, like the ones you see in your palm. If you're struggling to picture this, look at your hand and observe the width compared to the depth.
2. Add the Thumb
Next up, the thumb. The thumb is like a trusty companion to the palm. It attaches to the palm with a sort of triangular base and then extends into cylinders – a larger one for the base and a tapered one for the tip. Notice how it connects near the cushion of your palm. This is a crucial point, as it gives the hand its dexterous abilities.
3. Group the Fingers
Now, let's not get overwhelmed with each finger just yet. We'll use the mitten technique. Picture your fingers in a mitten – the fingers are grouped, simplifying the complex.
This step is about seeing the fingers as a unit, which is particularly helpful for complex gestures. Practice this, and you'll find drawing hands in different poses becomes more intuitive.
4. Detail Individual Fingers
With the mitten as your guide, it's time to focus on individual fingers. Each finger is a series of cylinders – flexible, bendable, and unique in its way. Start detailing them, using the mitten shape as a guide. Remember, fingers have joints and bends, so observe how they work together and apart.
How to Craft Lifelike Faces in Your Drawings
Drawing a face can be both an exciting and a challenging task for an artist. It's like piecing together a puzzle where each feature plays a critical role in bringing the portrait to life.
Let's walk through a step-by-step process that will help you master the art of drawing faces, both from the front and the side (profile) view.
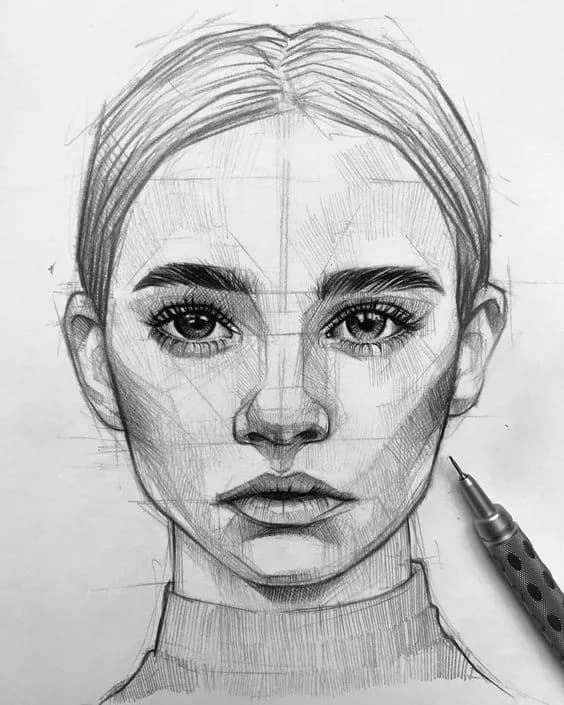
Step-by-Step Guide to Drawing a Realistic Face
Lay the Groundwork
Start by mapping out the space on your paper. A balanced approach is to draw a few guiding lines – a horizontal line for the eyes, one for the nose, and another for the mouth. This setup forms a basic framework, ensuring that all facial features are aligned and proportionate.
Sketch the Contours
Begin with a gentle outline of the face. Imagine the shape of an egg or an oval, gently tapering towards the chin. This outline sets the stage for the rest of your drawing, providing a canvas on which to build the features.
Eyes, Windows to the Soul
The eyes are central to the expression of the face. Start by drawing two almond-shaped outlines on the eye line. Remember, they should be an eye’s width apart.
Inside these, sketch the iris and pupils, adding a small reflection to give them life. Eyebrows sit just above the eyes, so add them with gentle, feathered strokes to mimic natural hair.
Craft the Nose and Ears
For the nose, begin with a light sketch, defining the bridge and the nostrils. The ears align with the eyes and nose, so place them carefully within these parameters. Ears have a unique shape, like a question mark, with intricate inner details.
Lips and Chin – The Final Touches
Lips can be tricky but start with a simple line for the mouth and then define the upper and lower lips. The chin follows the contour of the face, rounding off under the lower lip.
Bring it All Together with Shading
Shading adds depth and dimension. Observe where the light falls and where the shadows form on a face. Shade accordingly, adding darker tones under the nose, the neck, and beneath the eyebrows.
To Create a Face in Profile
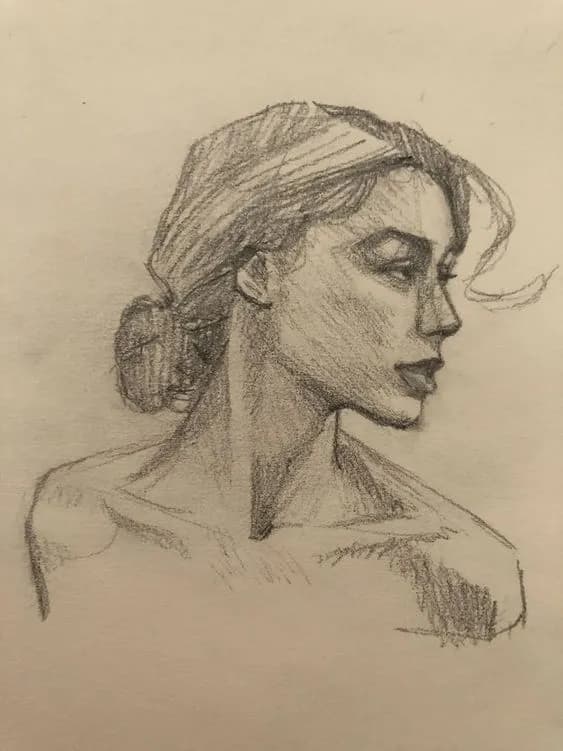
Drawing a face in profile presents its own set of challenges but offers a unique perspective.
Outline with a Circle and Line
Start with a circle for the cranium and a guiding line for the face’s direction.
Add Features in Profile
The nose, lips, and chin follow the guiding line. Remember, in profile, features like the nose and lips will extend beyond the initial circle. Pay attention to the angle of the forehead and the jawline.
Details and Hair
Add details like the eye, set back from the nose, and the ear, aligned with the nose and mouth. Hair in profile can add character to your drawing, so sketch it flowing naturally from the top of the head and down the back.
Fascinated by the art of drawing lifelike faces? So, why not leap and see your drawings evolve into beautiful, hand-painted canvas art with Photo2painting. Our team of professional artists specializes in turning your sketches into exquisite, high-quality paintings. Imagine the depth and dimension we can add to your portraits with expert shading and attention to detail.
Visit Photo2painting today to begin your journey from a sketch artist to a portrait master. Let us help you create a masterpiece that captures the essence of your work, adding that touch of authenticity and depth to your art.
How to Craft Cartoon Faces with Ease
Have you ever wondered how cartoonists create those engaging and expressive characters that charm both kids and adults alike? This process is not just about artistic skills but also about seeing the world through a simpler, more imaginative lens.
Cartooning is all about simplifying real-life details into basic shapes and expressions. It’s like being a magician, where with just a few strokes of your pencil, you can bring a character to life.
Start Your Cartoon Journey
The journey into cartoon drawing begins with the basics of human perception.
We humans have this unique ability to recognize and interpret simple shapes as complex objects.
For instance, a couple of circles and lines can instantly be recognized as a face. This simplification is the cornerstone of cartoon drawing. It’s about capturing the essence without getting bogged down in the details.
Build Your Cartoon Character
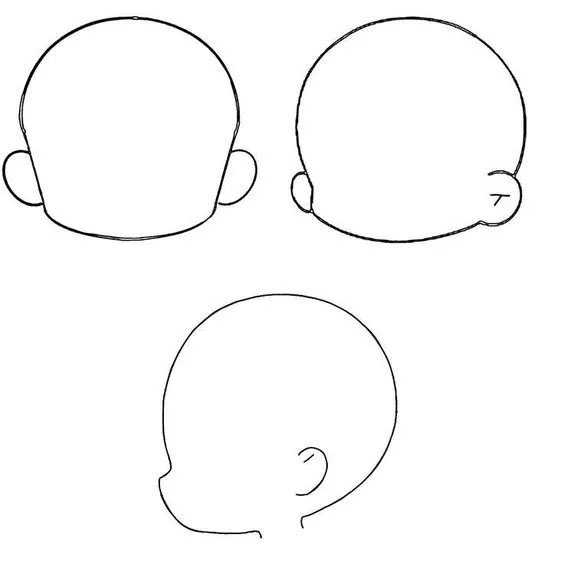
Let’s start sketching our cartoon character. The first step is usually drawing a basic shape, like a circle or an oval. This acts as the foundation of your character’s head. Then, we add the face axis with a vertical and horizontal line, giving us a guide to place the features symmetrically.
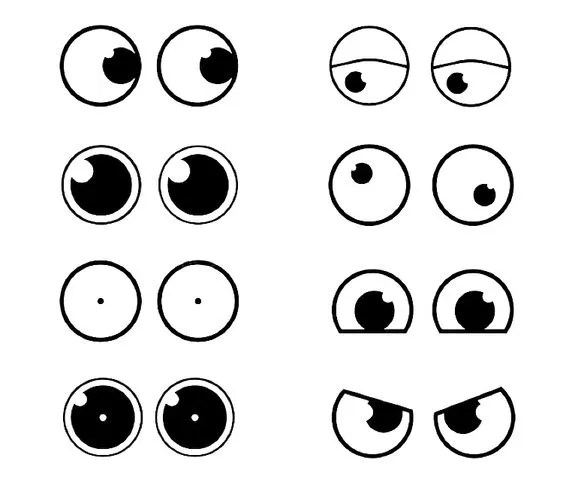
Drawing Cartoon Eyes
Drawing cartoon eyes is where you can infuse personality into your character. Start with simple oval shapes and remember to keep a gap between them. The eyes are the focal point of expression, so play around with their size and shape to convey different emotions. Add eyebrows just above the eyes to give even more expression.
The Nose and Mouth – Expressing Character
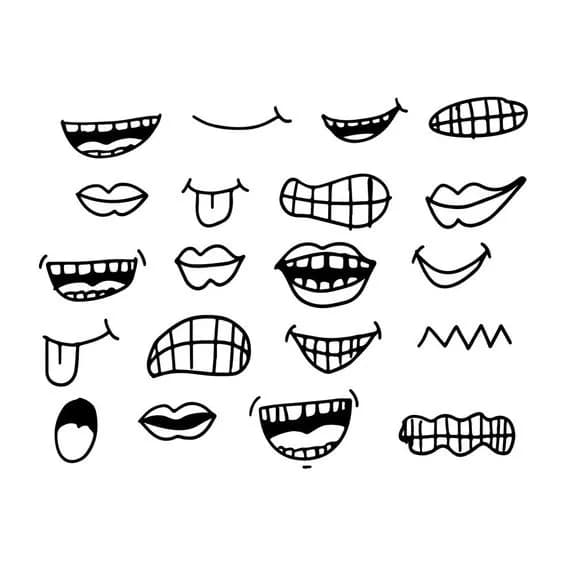
For the nose, keep it simple, especially for front-view faces. Sometimes, just a hint of the nose's side or tip is enough. As for the mouth, a basic line or a simple shape can convey a lot of emotions – happiness, sadness, surprise... the possibilities are endless!
Ears and Hair – Adds Personality
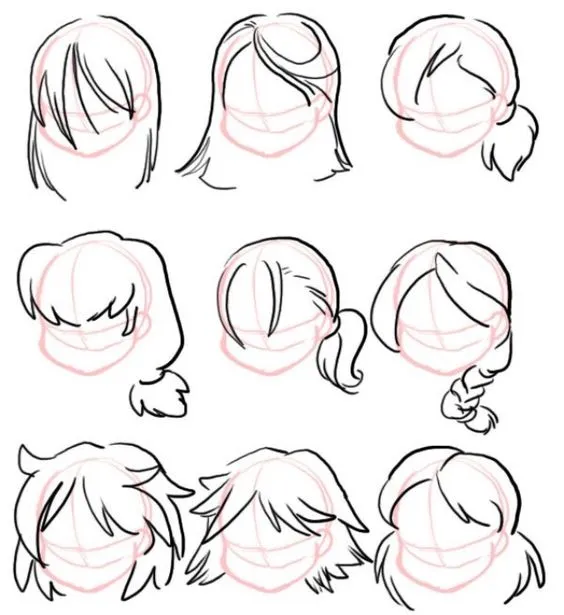
Cartoon ears can be as simple as basic shapes like ovals or semi-circles, especially when drawing a character facing the camera. Hair, on the other hand, is where you can get really creative. It helps in establishing the character’s personality. Is your character a rebellious teenager with spiky hair or a conservative character with a neat haircut? You decide!
Bring It All Together

Once you’ve got the basic features down, it’s about refining and adding your unique style to it. Remember, there’s no right or wrong way to draw cartoon hair or features. It’s your character, and it should reflect your artistic vision.
Are you ready to transform your favorite cartoon sketches into stunning, handcrafted canvas paintings? Visit Photo2Painting! Our mission is to turn your digital photos, including those charming cartoon characters you've created, into exceptional hand-painted artwork.
Our team of professional artists is dedicated to producing high-quality paintings that capture the essence of your drawings. We offer efficient delivery, transparent pricing, and exceptional customer support to ensure your satisfaction. Visit Photo2painting to turn your artwork into a memorable masterpiece!
To Master Proportions in Drawing
For artists to create authentic and harmonious works, mastering proportions in drawing is an essential skill. A keen eye for detail is especially important when dealing with natural and man-made objects, which each present unique challenges.
Proportions in Natural Objects
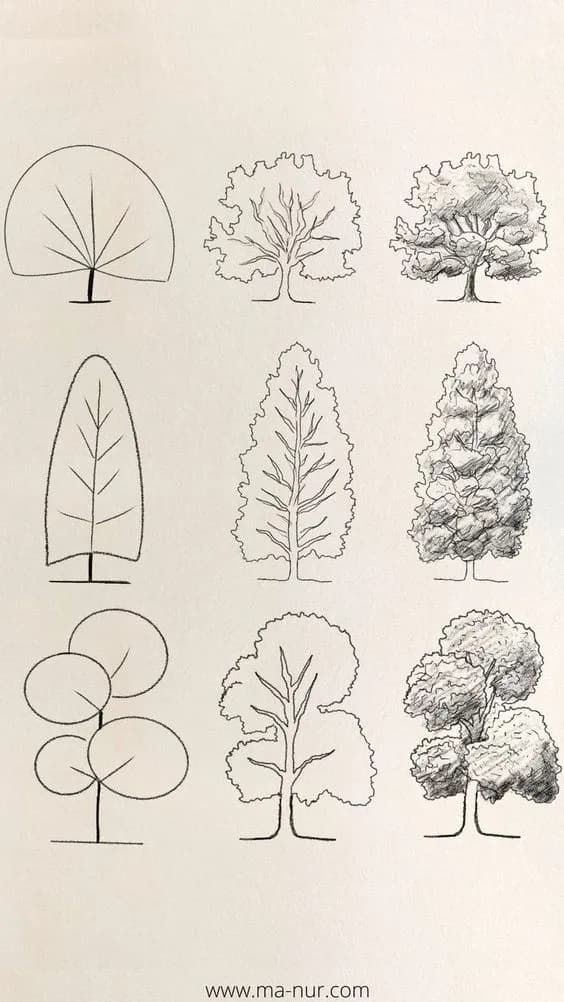
Drawing natural objects such as flora, fauna, and landscapes requires a deep understanding of nature's inherent variability and irregularity. Nature is rarely symmetrical or uniform, and this is where its beauty lies.
For instance, when sketching a tree, you need to consider the proportion of its trunk to its branches, and the branches to the leaves, keeping in mind that each tree has its unique form.
In animal drawings, the size relationships between different parts, like the proportion of a bird's wings to its body or the relative size of a fish's fins, are critical for convincing. This attention to proportion helps in capturing not just the physical accuracy of the subject but also its essence and movement.
Practicing with a wide range of natural subjects is key, as it hones the ability to observe and translate these proportions onto paper accurately.
Proportions in Man-made Objects
In contrast, drawing man-made objects, including architecture, vehicles, and everyday items, involves a different approach. These objects are often designed with specific dimensions and patterns, reflecting the precision and planning of human engineering. For example, a building must have a proportional relationship between its doors, windows, and other structural elements to appear realistic.
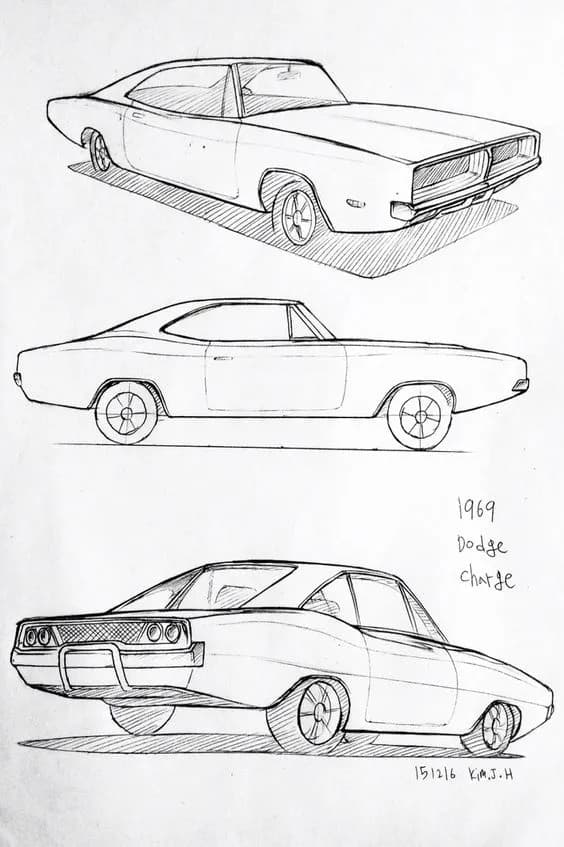
When drawing vehicles, such as cars or bicycles, understanding the proportional relationship between the wheels, the chassis, and the overall body is crucial. These objects often require a more methodical approach, such as using grid methods or rulers, to ensure that proportions are accurate and consistent. Understanding the geometry and symmetry in these objects is key to achieving a realistic representation in your drawings.
The Concept of Light and Shadow
This brings vitality, depth, and realism to artwork. It's a dance between illumination and obscurity that artists must master to effectively convey the full dimensionality and texture of their subjects.
What is Light and Shadow in Drawing
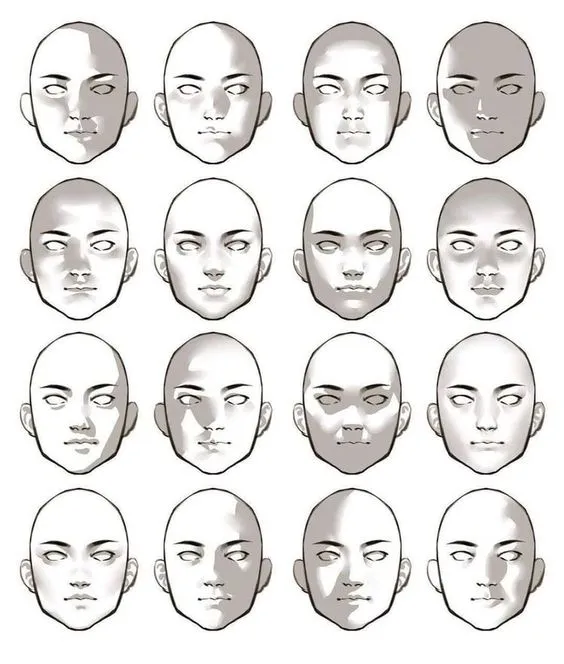
Grasping the interplay of light and shadow in drawing starts with a fundamental understanding of how light behaves. When light strikes an object, it creates a range of tonal values that define the object's form. The highlight, or the brightest spot where light directly hits the object, is the focal point of this interaction.
As the object's surface curves away from the light, it transitions into shadow. This shadow can be broken down into two distinct parts: the core shadow, which is the darkest area where the object receives no direct light, and the reflected light, where light bounces back into the shadow from other surfaces.
Another crucial aspect to consider is the cast shadow, the silhouette the object projects onto other surfaces or itself, further defining the shape and position of the object in space.
Notice how different light sources affect the appearance of objects. A bright, direct light, like that of the midday sun, will cast sharp, defined shadows, creating a high-contrast and dramatic effect.
On the other hand, an overcast sky diffuses light, softening shadows, and reducing contrast. The color and temperature of the light source also significantly influence the appearance of shadows. For instance, a warm evening light casts long, golden-toned shadows, while a cool moonlight would give rise to soft, bluish hues.
Apply Light and Shadow in Practice
The first step is to establish the light source's direction. This decision influences the placement and intensity of highlights and shadows across your subject. Start by gently outlining the areas where light and shadow fall, keeping the object's form and texture in mind.
As you begin to shade, gradually build up the intensity of your shadows. Pay attention to the subtle transitions from light to dark, known as the terminator. This transition is rarely a harsh line but rather a gradual gradient that suggests the object's curvature.
In addition to considering the light's direction and intensity, it's important to factor in the material and texture of the object you are drawing. Different materials interact with light uniquely: a glossy surface like glass will reflect sharp, clear highlights and shadows, while a matte surface such as fabric will have softer, more diffuse shading.
Conclusion
Each artistic venture demands a unique blend of patience, observation, and personal expression. Whether it's the simple yet profound act of drawing, the creation of a cartoon, the precision of capturing accurate proportions, or the play of light and shadow to bring a drawing to life, each aspect of art is a testament to the thought and care you put into it.
Ultimately, It's about making a connection, whether with the subject of your drawing or the person receiving your gift. It's about showing how much thought you've invested, how deeply you've looked into understanding the details, and how each stroke of your pencil or choice of gift is a reflection of your consideration and care.
Frequently Asked Questions
How do you choose the right paper and pencils for your pencil drawings?
Choosing the right paper and pencils depends on what you're drawing. For sketching and practice, a standard sketch pad and HB or 2B pencils are great. If you're working on detailed drawings, consider smoother, higher-quality paper and a range of pencils (from 2H to 6B) for different shades and depths.
Can anyone learn to draw, or is it a talent that some people have?
Anyone can learn to draw! While some people may have a natural aptitude, drawing is a skill that can be developed with practice and dedication. It's all about training your eye, hand coordination, and understanding basic techniques.
What common mistakes do beginners make when learning to draw, and how can they be avoided?
Beginners often struggle with proportions, perspective, and overly harsh lines. To avoid these, start with simple shapes, practice basic forms like cubes and spheres, and use light strokes initially. Learning to observe and replicate basic shapes in everyday objects is a good starting point.
How do you start learning to draw with zero experience?
Begin with the basics. Focus on simple shapes and objects, and try to replicate them. Use references, like photographs or objects in your environment. Practice regularly and be patient with your progress. Consider following online tutorials or enrolling in a beginner's drawing class.
Any good book to learn drawing for beginners?
Drawing on the Right Side of the Brain" by Betty Edwards is highly recommended for beginners. It offers excellent techniques and exercises to develop your drawing skills. Other good options include "Keys to Drawing" by Bert Dodson and "The New Drawing on the Right Side of the Brain Workbook" by Betty Edwards.
George, CEO of Photo2painting, is a passionate art lover and entrepreneur. He founded Photo2painting.com from scratch, inspired by his artist friends. As the company's CMO, he manages content and marketing.
Excellent Customer Reviews