Pastel Painting: A Simple Guide for Creative Beginners
Author:
GeorgeUpdated:
09.06.2025

- Key Takeaways
- What is Pastel Painting?
- 4 Types of Pastels and Their Uses
- 1.1. Soft Pastels
- 2.2. Hard Pastels
- 3.3. Pastel Pencils
- 4.4. Oil Pastels
- 5.Which Type Should You Use?
- 1.
- Must-Have Tools and Materials
- 6.Papers and Surfaces Suited for Pastel Work
- 7.Blending Tools
- 8.Fixatives: What They Are and When to Use Them
- 9.Storage and Preservation Tips
- 6.
- 5 Basic Techniques for Beginners
- 10.1. Layering and Blending
- 11.2. Shading and Color Mixing
- 12.3. Underpainting and Sketching
- 13.4. Highlights and Texture Tricks
- 10.
- 4 Common Mistakes to Avoid
- 14.Over-blending
- 15.Using the Wrong Surface
- 16.Skipping Fixative
- 17.Poor Storage and Smudging
- 14.
- How to Start Your First Pastel Painting
- 18.Step-by-Step Walkthrough of a Simple Still Life or Landscape
- 19.Tips for Choosing Your Subject
- 20.Setting Up Your Workspace
- 18.
- 5 Inspiring Ideas for Your Next Pastel Artwork
- Where to Learn More and Improve
- 21.Books, Courses, and Online Tutorials
- 22.Artists to Follow for Inspiration
- 23.Communities and Forums
- 21.
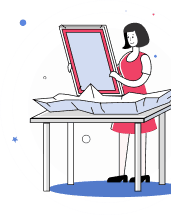
Have you ever felt like painting is too complicated? Too many brushes, messy paints, and confusing steps? You’re not alone. A lot of people think making art means buying tons of tools and learning a bunch of rules.
That’s where pastel painting changes everything.
It’s simple, colorful, and easy to start.
As the famous artist Edgar Degas once said,
“Pastel is painting with color, direct and pure, without the intervention of a brush or liquid.” You hold the color right in your hand - no brush, no water, just you and your creativity.
In this article, we’ll show you what pastel painting is, the tools you need, easy techniques to try, and how to create your first piece - even if you’ve never painted before.
Key Takeaways
Pastel painting uses pure pigment sticks—no brushes or water needed.
There are different types: soft, hard, oil pastels, and pastel pencils, each with their own style.
Use textured paper so the pastels stick and layer properly.
Blending, layering, and shading are the basic techniques to learn first.
Fixatives help protect your work from smudging.
Keep your finished artwork stored flat or framed under glass.
Start with simple subjects like fruit, flowers, or landscapes.
Pastels are perfect for beginners—they’re simple, expressive, and fun to use.
You can mix pastels with other materials like watercolor or ink.
What is Pastel Painting?
Pastel painting is a form of art where you draw and paint using sticks of pure pigment. These sticks come in different types - soft pastels, hard pastels, oil pastels, and pastel pencils. Each one gives a different effect, but all of them let you put color directly onto the paper without needing a brush or water.
Soft pastels are the most vibrant and blend easily. They’re great for bold colors and smooth shading. Hard pastels are firmer, making them better for fine lines and details. Pastel pencils are perfect for sketching or adding sharp edges, while oil pastels are creamy and rich, almost like painting with lipstick.
Pastels have been around for centuries. Artists started using them in the 16th century, but they really took off in the 18th and 19th centuries. Famous painters like Edgar Degas and Mary Cassatt used pastels to create stunning portraits and scenes full of life and motion.
Today, artists still love pastels because they’re quick to use, mess-free, and full of color. You can work fast or take your time, and you don’t need a big setup. Pastels give you control, freedom, and a direct connection to your artwork. Just color in your hand and a blank page ready to come alive.
4 Types of Pastels and Their Uses
There are four main types of pastels, and each one works a little differently. Picking the right one depends on what kind of art you want to create.
1. Soft Pastels
Soft pastels are known for their rich color and smooth texture. They’re easy to blend and perfect for creating soft edges, vibrant shading, and expressive strokes. Artists often use them for portraits, landscapes, and anything that needs strong, vivid color.
2. Hard Pastels
Hard pastels are less crumbly and more solid than soft pastels. They’re great for sketching, outlining, and adding precise details. They don’t blend as easily, but they work well when you need clean lines or want to build up layers without too much smudging.
3. Pastel Pencils
Pastel pencils offer the control of a regular pencil with the color and texture of pastels. They’re ideal for fine details, small areas, and finishing touches. Beginners often find them easier to handle, especially for drawing or adding sharp edges to soft pastel work.
4. Oil Pastels
Oil pastels are smooth, creamy, and behave more like paint. They don’t smudge as much as dry pastels, and you can blend them using tools or even solvents. They’re perfect for bold, textured work and mixed media art.
Which Type Should You Use?
Soft pastels are best for bold color and smooth blending. Hard pastels and pastel pencils are great for fine details and control. Oil pastels are ideal if you want a painterly, textured look. Choosing the right type depends on your style and what kind of art you want to make.

Must-Have Tools and Materials
Starting with pastels is exciting, but having the right tools can make a big difference in how your artwork turns out. While pastels themselves are the star of the show, the paper you use, how you blend, and how you protect your work all play an important role. Whether you're just beginning or looking to improve, understanding the basic materials will help you get the most out of every drawing. Let’s take a look at what you’ll need to make your pastel art easier, cleaner, and more fun.
Papers and Surfaces Suited for Pastel Work
Not all paper works well with pastels. You need something with a bit of texture, called “tooth,” to help the pastel stick. Popular choices include sanded paper, pastel paper pads, or textured watercolor paper. The rougher the surface, the more layers of pastel you can apply.
Blending Tools
Blending is a big part of pastel art, and there are different ways to do it. You can use tortillons (blending stumps) for small areas and details. Your fingers work great for larger areas and soft transitions. Some artists even use brushes or soft cloths for smoother effects. Try different tools to see what feels right for your style.
Fixatives: What They Are and When to Use Them
Fixatives are sprays that help hold the pastel in place so it doesn’t smudge. They come in workable and final versions. A workable fixative lets you add more layers after spraying, while a final fixative is for sealing your finished piece. Use them lightly and always spray in a well-ventilated area.
Storage and Preservation Tips
Pastels can smudge easily, so handling and storing them carefully is important. Always store finished work flat, with a sheet of glassine or tracing paper over it. If framing, use a mat and glass to keep the artwork safe. Keep your pastel sticks in a box with foam or dividers to avoid breaking and mixing colors.
5 Basic Techniques for Beginners
Learning a few simple techniques can help you feel more confident with pastels and take your artwork to the next level. These basics are easy to try and can be used in almost any drawing or painting, no matter your subject.
1. Layering and Blending
Start by applying light layers of pastel and then build up more color on top. This helps you avoid making the paper too full too fast. For blending, you can use your fingers, blending stumps, or even a soft cloth to smooth the colors together. Blending helps create soft transitions and realistic shadows.
2. Shading and Color Mixing
Use the side of your pastel stick for wide, soft shading and the tip for smaller, detailed areas. You can mix colors by layering one over another, blending them to create new tones. Try using light pressure for lighter shades and more pressure for bold, deep colors.
3. Underpainting and Sketching
Before you start adding color, sketch a rough outline of your subject using a pastel pencil or a light pastel color. Some artists also use an underpainting - light washes of color (sometimes with watercolor or diluted pastel) - to block in the main shapes and tones before working in more detail.
4. Highlights and Texture Tricks
To make parts of your artwork stand out, add highlights last using a light pastel like white, cream, or pale yellow. For texture, try pressing harder with the pastel, dragging it across rough paper, or layering in different directions. You can also scratch into the pastel with a toothpick or knife to create lines and textures.
4 Common Mistakes to Avoid
Pastel painting style is fun and flexible, but a few simple mistakes can make it harder than it needs to be. Knowing what to watch out for will help you enjoy the process more and create better results from the start.
Over-blending
Blending is useful, but doing it too much can make your colors look muddy and flat. It can also take away the vibrant texture that makes pastels special. Try blending just enough to soften edges or mix colors - then let the natural strokes show through.
Using the Wrong Surface
Pastels need paper with texture to hold the pigment. If you use smooth paper, the pastel won’t stick well, and the colors might fade or fall off. Make sure you’re using pastel paper or another surface with a good tooth so your layers stay in place.
Skipping Fixative
Without fixative, even the best pastel work can smudge or fade over time. While you don’t need to spray after every step, using a workable fixative as you go - and a final one at the end - can help protect your artwork and make it last longer.
Poor Storage and Smudging
Finished pastel pieces are delicate. Storing them without protection can lead to smudging or damage. Always store your artwork flat, with a sheet of glassine or tracing paper on top. If possible, frame it under glass. Also, keep your pastel sticks organized to avoid broken tips and color messes.
How to Start Your First Pastel Painting
Starting your first pastel painting can feel a little overwhelming, but it doesn’t have to be. With just a few steps and the right setup, you’ll be ready to create something you’re proud of - whether it’s a simple still life or a peaceful landscape.
Step-by-Step Walkthrough of a Simple Still Life or Landscape
1. Pick your subject
Choose something simple, like a bowl of fruit, a flower, or a small landscape photo.
2. Light sketch
Use a pastel pencil or a light-colored pastel to sketch the main shapes.
3. Block in colors
Add your first layers of color, keeping the pressure light. Focus on the biggest shapes and areas.
4. Build up layers
Slowly add more layers, working from dark to light. Start adding details and blending as needed.
5. Add shadows and highlights
Use darker tones to create depth, and finish with bright highlights where the light hits.
6. Spray fixative (optional)
Lightly spray a workable fixative if you plan to keep going or a final fixative once you’re done.
Tips for Choosing Your Subject
Keep it simple for your first try. A single object or a calm scene with a clear light source is easier to understand and paint. Look for strong shapes, interesting shadows, and a subject that makes you feel something - it’ll help you stay inspired.
Setting Up Your Workspace
Find a flat, well-lit area where you can work comfortably. Use a drawing board or table, and tape down your paper to keep it steady. Keep your pastels organized by color or type, and have a cloth or paper towel nearby for cleaning your fingers. Good lighting - natural light or a bright lamp - makes it easier to see your colors clearly.

5 Inspiring Ideas for Your Next Pastel Artwork
Once you’ve tried the basics, it’s time to explore different subjects and styles. Pastels are super flexible, which means you can use them for almost anything - from realistic portraits to wild, colorful abstracts. Here are some fun ideas to get you started.
Portraits
Soft pastels are perfect for capturing skin tones, shadows, and subtle details in faces. Try drawing a friend, a family member, or even a self-portrait. Focus on light and expression rather than perfection - it’s all about capturing personality.
Landscapes
Pastels make landscapes come to life with their bold colors and blending ability. Start with a simple scene like a beach, a sunset, or a quiet forest. Use layering to show depth and blend the sky and ground smoothly for a natural look.
Abstracts
If you want to let go of structure, abstract art is the way to go. Play with shapes, colors, and textures. You can blend, scratch, layer, or smudge - anything goes. Abstract pastels are great for expressing mood and emotion.
Animals
From pets to wildlife, animals make great subjects. Use pastel pencils for details like fur, eyes, and whiskers. Focus on one part of the animal - like just the face or just the eyes - if a full-body drawing feels too tricky at first.
Mixed Media Options
Pastels also work well with other materials. Try combining them with watercolor, ink, or charcoal. You can use watercolor for a soft background, then add pastels on top for bold details. Mixing media gives your artwork texture and extra depth.
Where to Learn More and Improve
Pastel painting is something you can keep growing with, no matter your skill level. There are tons of resources out there to help you learn, practice, and connect with other artists. Here’s where to start.
Books, Courses, and Online Tutorials
Books like Pastel Painting Atelier by Ellen Eagle or Painting with Pastels by Maggie Price are great for learning techniques and seeing real examples. Online platforms like Skillshare, Udemy, and YouTube offer step-by-step tutorials, from beginner basics to advanced projects. Look for courses that include demos, practice exercises, and feedback.
Artists to Follow for Inspiration
Following experienced pastel artists can be a huge source of learning and motivation. Artists like Karen Margulis, Richard McKinley, and Marla Baggetta regularly share their work, tips, and process videos online. Seeing how they work with color and composition can spark new ideas for your own art.
Communities and Forums
Joining an art community can help you stay inspired and get feedback. Check out online forums like WetCanvas, or join Facebook groups for pastel artists. On Instagram or Reddit, search hashtags like #pastelpainting or #pastelart to connect with others, share your work, and learn from what others are doing. Being part of a community makes the learning process more fun and a lot less lonely.
Conclusion
Pastel painting is one of the most direct and rewarding ways to create art. You don’t need fancy tools or years of training - just a few sticks of color, the right surface, and your imagination. Whether you're blending soft skies, sketching a detailed portrait, or playing with bold abstract shapes, pastels let you explore freely and express yourself with ease.
As Jean-Étienne Liotard once said,
“The great advantage of pastel is that it is a finished drawing as soon as it is begun.”
That’s the magic of this medium - immediate, vibrant, and full of life. So grab your pastels, pick a subject that excites you, and start creating. Your first masterpiece might be just one stroke away.
Frequently Asked Questions
What’s the difference between soft pastels and oil pastels?
Soft pastels are dry, powdery, and easy to blend with your fingers or tools. Oil pastels are creamy, thicker, and behave more like paint. They don’t smudge as easily but are harder to layer. Each gives a different feel and look to your artwork.
Can I erase pastel?
Not completely. You can lighten or lift some color with a kneaded eraser or soft brush, but pastel doesn’t fully erase like pencil. That’s why it’s best to start with light sketching and build up slowly.
What kind of paper should I use for pastel painting?
Look for paper with a tooth or texture, like sanded paper, pastel paper pads, or heavyweight watercolor paper. Smooth paper won’t hold the pastel well, and your colors might not layer properly.
Can I mix pastels with other art materials?
Yes! Many artists mix pastels with watercolor, ink, or charcoal. You can use watercolor for a background wash, then layer dry pastels on top for bold details. Just make sure the paper can handle the combination.
How do I keep my finished pastel art from smudging?
Use a fixative spray and store your work flat with a sheet of glassine or tracing paper on top. If you’re framing it, use a mat to keep the pastel from touching the glass.
Is pastel painting good for beginners?
Absolutely. Pastels are easy to pick up and don’t require a lot of tools. You can start with just a few colors and a piece of textured paper. The results are immediate, and the learning curve is gentle.
George, CEO of Photo2painting, is a passionate art lover and entrepreneur. He founded Photo2painting.com from scratch, inspired by his artist friends. As the company's CMO, he manages content and marketing.
Excellent Customer Reviews